Any contractor that works with and transports hazardous chemicals needs to also have with each vehicle that contains these hazardous chemicals a chemical spill kit to comply with OSHA standards.
Most contractors are unaware that they need to have or how to use a spill kit. Just like many do not have or carry fire extinguishers. But OSHA has standards for the safety of the employees and the public at large when it pertains to hazardous chemicals.
I spoke in my last post on what OSHA says what a spill kit is and what has to be in a spill kit, and in fact they are pretty vague on a number of points but I will not go back over them, just please visit that post.
Now as I said in my last post you can buy ready made kits but I will show you how you can make your own DIY for many times much less and still be within the guidelines.
Here again is the list of required items for a spill kit:
A warning measure; A frame floor sign, caution tape, cones, etc.
PPE for at least one person effective to protect them from the spill during removal. Gloves, glasses or goggles, mask, shoe covers, etc
A physical barrier to place around the spill to contain it, which may or may not also absorb, OSHA does not say it has too. Can be berms, bumpers, drain covers, even sand.
Absorption materials; Sand, clay, pads, mats, etc.
Removal equipment; broom, shovel, waste pan or scoop
Removal containers; can be the spill kit container itself, bags or other approved container.
Products to clean the area once the spill has been removed. Such as a mop, cleaner, sponges.
And that is it.
If you can not reasonably carry a kit large enough to handle all the chemicals on your own you at least need to have available enough to lessen a spills impact before the proper first responders and hazdardous material removal teams can get there.
This could include using materials to contain as much as possible, block or close off storm drains, prevent running across a road, traveling into a waterway, etc.
Here is what I bought and put into my own DIY 5 gallon spill kit:
I used a white cleaned out 5 gallon UN approvel pail. Make sure it only contained as near neutral a soap as possible but a pail from something else like a Firehouse Pickle pail can be fine too, plus it is already red, or an orange Home Depot pail.
I wanted my kit to supply two people to use as a Universal Kit that could take care of a 5 gallon size spill.
Here are items I picked up at the Dollar Tree: a bag of cat litter, pack of 5 puppy training pads, 2 pair of safety googles, a plastic dust pan with sweep brush, a small sqeege, pack of 8 Nitrile gloves, a red and white clothes line (to use to rope off spill area) Bright red tape, Heavy weight zip storage bags, a small bottle of Lysol disinfectant cleaner, a pack of 6 absorbant pads. $11.00
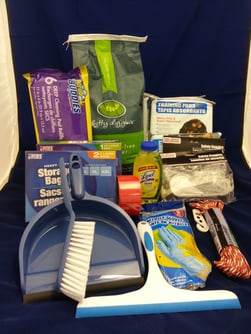
A stop at a Dollar Store for large sponges and zip ties, $4.00+ some change.
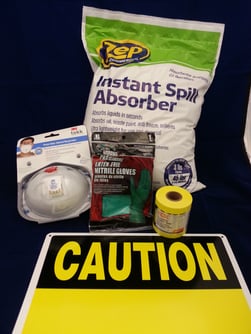
Then I went to Home Depot and got:
A two pack of N95 masks, a roll of caution tape, a caution sign (to hang on the rope), one pair of heavier Nitrile gloves if needed, and a 3 lb bag of Zep instant spill absorber and one bag of play sand. This was my most expensive stop and not all of the supplies are all going in. $32.00
Plus a few items I had lying around the house so they were at no cost. Total still under $50 unless you have to buy the pail, which I did not.
Here is how I put it together:
Got the pail clean and ready by labeling for the type, Universal and amount of chemical it should treat, 5 gallons.
Put the items you will use last in the bottom, fill up until what you will need first on top.
So cleaning items in first: Lysol, sponges.
Then the disposal items: marked hazardous bags, extra zip ties.
The disposal removal items: broom and pan
The absorbant materials: the pupply pads, cat litter I had poured into an empty quart milk jug and marked with permanent marker, 2 Heavy zip bags filled with the Zep absorbor material about 1 lb each.
Containment materials; Two homemade berm socks made from the cut off legs of a pair of knit tights fiiled with sand and tied closed. And another quart milk jug filled with more loose sand to use if the socks are not enough.
PPE next: Masks, Gloves and goggles all in their own baggies so you open only what you need.
Warning measures on top: Sign, caution tape and rope.
And that completes the kit.
If you would like a copy of my e-book How to make your own OSHA Spill Kit, email me at lchambers@georgiachemical.com
Next Post: How to use the kit to clean up a spill.